If you are reading this blog, chances are you love making crafts. BUT, you've probably made most of your gifts without setting your hands on a saw or a wrench. Ladies, we can do it.
After learning some tiling skills from my dad this past week, I realized I'd wasted a lot of time assuming I couldn't do "big" projects around the house. I could have spent the past decade learning how to cut wood, use a sanding machine, and measure properly. I'm not sure why I steered clear of tools all these years. I'm not sure why I learned how to use a glue gun with grandma, but avoided the nail gun with pops. I can't wait to tile a wall now. I know these aren't the kinds of tips that everyone can use. But, I'm going to stop assuming that none of our readers would dare use a saw. Yes, we can.
Once you have some one-on-one training, this little tip might come in handy. The dial on the base of your saw allows you to set accurate measurements for the angle of your cut.
After a lot of use, your dial may not be accurate anymore, just like the weight on a scale. Here's how you can check the accuracy: Set your angle to "0" and cut your wood.
Cut a wide piece of scrap wood straight across with no angle. Initially, the cut looks straight. The two pieces of wood fit together perfectly.
Now, flip one side of the wood over and place the two pieces together again. If the wood doesn't come together perfectly, it wasn't a straight cut. Your saw cut with some degree of an angle. Your dial isn't correct and you either need to fix it or adapt when you cut.
Thanks to dad for another tip. I'm enjoying learning all the things that are usually just passed down to sons. Good luck with your own projects!!
Friday, April 29, 2011
Wednesday, April 27, 2011
Lamp Shade D.I.Y.
BEFORE
I have this very stylish friend Jay. We met once at a Christmas party and then we quickly became Facebook friends-- but sadly he lives in another city and I haven't had a chance to hang out with him since. Even so, we still chat on FB and I was surprised to see he's got a little crafty in him today. When he posted the easiest D.I.Y. project for his friends to see I told him I had to share it with you! Here's what he told me:"I was going to throw that heinous shade away. Then I had the idea of messing with it... I went to Michael's looking for sequins to glue on it and i found this kid's sheets.. i have no idea what kids would do with it, but it was a sticker so i thought how much easier it would be to use that instead of gluing each sequin one by one hehe."
He measured it out and stuck it on to the shade! SOOOO Easy!!! I have to admit-- I want to do this for one of my shades!! Thank you Jay! I love your new lamp shade!
AFTER
Labels:
DIY,
lamp shade,
paper
Tuesday, April 26, 2011
Tasty Tuesday: Crock Pot Cooking
Ok, so you have freezer prepared meals but there are some days when you want to come home to a warm cooked meal. That's when you get a wife-- well, if you are the wife-- that's where the crock pot comes in handy.
The other day I made a recipe that was so easy and yet so delicious it would make you wanna slap yo mama! These pictures just don't do it justice- it was great. I got it off the internet and was talking with a girlfriend of mine when I told her that I have a good slow cooker book but the recipes were so in depth they were intimidating. She pulled out this book "Crock Pot: The Original Slow Cooker". I'll admit I was hungry when I cracked it open but the next day I kept thinking about some of the recipes.
There are three books in one: chicken recipes, 5 ingredients or less and soups. All of the recipes seem very simple. I hunted it down and now own it myself. $9.98 well spent. So, now that I have an organized freezer my next step is to plan out my meals and you can bet your bottom dollar- one of our meals will be a crock pot recipe.
To make this lovely meal:
-brown Italian sausage links whole (we used sweet but you could use spicy too)
-put one can whole tomatoes in crock pot then squish them up
-submerge the whole sausage links and drippings in the tomatoes
-add 1 chopped onion
-add 3 or 4 small potatoes
-season to taste (I used salt, pepper and some garlic)
-let it cook on low for 4 hours
-the last 1/2 hour add zucchini and or squash
When this is done cooking pull out sausage, cut into circles, throw them back in and stir. Sprinkle some bread crumbs on top of served up dish with some cheese on top.
This was such an easy recipe and it was a huge hit in our home!
Monday, April 25, 2011
Reaching For Light
In my hometown we have gone through days of cold weather, gray skies, and rain. I was longing for the beauty of Spring, lots of color, and flowers reaching for light. The forecast hasn't been cooperating with my vision.
I was drawn back to a journal entry I did in the Fall, when I was anxious about the oncoming Winter. More than ever, I understand how the seasons and the weather can affect mood and spirit. I think this journal entry, with few words, speaks volumes about what I was feeling that day.
We know our crafty friends like to express themselves with drawings, scrapbooks, and quilting, etc. Instead of limiting yourself with a notebook, try an art journal this year. Don't let the lines on your paper keep you contained. I love chalk ink. It glides on smooth and is kind to people who don't draw professionally. These are fairly expensive, but so fun to use. I drew free-hand because nothing has to be perfect in your journal. Let go. Use your craft embellishments to make your next entry 3-dimensional. I added flowers to my Spring page. This post is to give you ideas. The challenge is to get you to gather some bits and pieces to make your own version. THEN, use the free space to write like you normally would in a journal. See what the experience brings out of you.
Sunday, April 24, 2011
Happy Easter
This little ceramic egg was put out for my nieces to find one year ago. Apparently, everyone overlooked it, even the adults. I finally noticed it last September, a lonely little egg, waiting to be found for months. This demonstrates how little we actually notice around us. The egg was placed on a corner of the TV entertainment center. Naturally, we stare at that area all the time, without ever really being 100% conscious. When I was searching the corners of the house for handmade crafts to share on this blog, I finally noticed the long lost Easter egg. I decided to put it back this year. The girls are a year older and wiser. Maybe they'll find it now. It will be like measuring growth on a wall. Part of me would be a little sad if they do find it. The other half of my mind will happily celebrate the fact that they should always be making new discoveries, for the rest of their lives. Happy Holidays.
Friday, April 22, 2011
Easy Football Cake
I am not a cake designer. Those amazing bakers on reality TV programs, who make cakes that look like the Mona Lisa are the pros. I can spread frosting and put sprinkles on top. As I was filtering through pictures recently, I found a picture of a cake that a friend baked a few years ago, for a Superbowl party. I'm sharing it because it is simple, achievable, and even I could do it. I realize this isn't an artistic breakthrough that must be admired. Heck, anybody could pull this off. That's the point. The goal here is to give an easy idea to an overwhelmed mom, who has limited time. If your son loves playing football at school and you want to bake a treat with a touch of personality, make a football field on top of your cake. Even if you can't find the cute little plastic players and the goal posts, you'll still get an "A" for effort.
Wednesday, April 20, 2011
Organize It!: School Documents
I got this latest tip from an uber-organized former co-worker. She NEVER had clutter, ALWAYS knew where to find documentation, and she claimed to be equally organized at home. I BELIEVE HER!
With three children bringing home a mountain of important education documents, I am drowning in school papers. I feel pressure to keep everything for future reference. In the past, I stored everything in bins that would get overloaded, with no organization. Now, I put school documents in binders.
As soon as the kids arrive home, I sort their papers into two categories: the throw away pile or the file away pile. Immediately punch holes in the pages that need to be filed. Then, PUT them in the binder. I have dividers with simple categories: school, extra-curricular, sports. One other note- I have one binder per child. It is now much easier for me to find a note from the teacher, a reminder about an important meeting, or instructions for those pesky math questions!
There you go-- now get out there and ORGANIZE IT!
Labels:
documents,
education,
organize it
Tuesday, April 19, 2011
Tasty Tuesday: Tikka Masala
I've become addicted to this meal. I love Indian food. The spices are so rich and flavorful. Making a dish from scratch sounds more intimidating than it actually is. There is an art to it. I've had it come out particularly dry OR nice, thick, and juicy.
McCormick makes pre-measured spice packets now, with different recipes attached to the back. Yes, the price for a pinch of six spices is a bit high. But, this is an easy way to sample a recipe without buying full bottles of each spice. I've tried to make most of McCormick's spice packet recipes. The Chicken Tikka Masala is one of my favorite meals.
I'll try to give you their recipe here, with notes from me along the way:
You will need:
-------------------------------------------
2 tsp. Paprika
1 tsp. Minced Garlic
1 tsp. Garam Masala (This is part of McCormick's Gourmet Collection)
1/2 tsp. Ground Cumin
1/2 tsp. Crushed Red Pepper
-------------------------------------------
1/2 tsp. salt
1tbsp. cornstarch ( I never use it to avoid the carbs, but it will help thicken it up)
1/3 cup heavy cream ( I probably do 1/2 cup easy, but I don't use cornstarch)
2 tbsp. butter
2 tbsp. lemon juice ( I probably do 3 tbsp.)
1 medium onion, chopped (I use two)
1 can diced tomatoes, undrained ( I also add a couple of fresh tomatoes that I cut up)
1 1/2 lbs. boneless skinless chicken breasts, cut into 1-inch cubes (I use 2 very large chicken breasts)
-------------------------------------------
Now, the ingredients I have here give me enough to split it into more than one meal...about one breast per sitting...but I have lots of sauce...which is what I prefer. One breast is super filling since you serve this over rice.
-------------------------------------------
Cooking Directions:
1-Melt butter in large nonstick skillet on medium heat.
2-Add chicken, onion and lemon juice; cook & stir 10-minutes until chicken is no longer pink.
3-Add spices 1-5 plus the salt if you aren't going to use cornstarch. Hold the salt if you are. Cook and stir for 1 minute.
4-Stir in tomatoes until well mixed.
5-Stir cream into cornstarch and salt until smooth. ( I just add the cream directly minus cornstarch).
6-Gradually stir and bring to a boil. Reduce heat to low, stirring frequently, simmer 5-minutes or until slightly thickened. (I cover mine in a dish on the stove and let it simmer for awhile, making sure it doesn't get dry).
7-Serve with cooked rice or naan bread.
--------------------------------------------
You can buy basmati rice in the store, but good luck finding good naan bread anywhere. I just eat it without naan.
I recommend you try it. It is so tasty, especially if you cook it a few times and get a feel for it. Your house will smell like Indian food though. This is NOT for the meat and potato type. But, you all know that. Have fun!!
Monday, April 18, 2011
Paper Flowers
Flowers can be the perfect touch on a scrapbooking layout. I've bought my fair share of cute crafting flowers over the years, always paying more than I should.
Still, I'd find myself struggling to match the exact shade of the embellishment with my background paper. That problem is solved.
You can make beautiful flowers out of any paper pattern that you like.
The crafty gals at Captured Moments taught me how to make my own flowers. Start by punching out three paper circles, each slightly bigger than the next.
Crinkle the edges of each circle with your fingers. Use your thumb and forefinger to hold the center of the paper in place. It is important that the edges are bent and wrinkled enough to break up the fibers in your paper. Eventually, start to shape your circle, with portions raised and lowered, to give the flower dimension.
Once you're done crinkling, ink the edges of your flowers to add a subtle coloring. Layer the circles with the largest piece in the back and the smallest up front. Use a brad or button to hold the pieces together. Then, add leaves using the same crinkle method. Cut roughly the shape of a leaf, crinkle it, and glue it down. Voila!! You have a handmade flower with any paper pattern you like. If you want to see the full page layout the girls from Captured Moments created, using this flower, scroll down the the next blog post.
Labels:
captured moments,
crinkle,
embellishments,
flowers,
scrapbooking
Sunday, April 17, 2011
Mixing Patterns
One of the things Crafty Girl and I admire most about our friends over at Captured Moments, is that they are not afraid to mix patterns and colors.
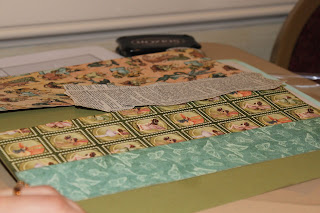
During our scrapbooking retreat each year, we generally sign up for their make-n-take class, because they are so talented. This year, they offered a standard 12X12 page. All of the supplies were cut and prepped in advance. We were just told how to assemble it.
Admittedly, when I pick out background and border paper for a page, I always go for coordinated colors and patterns. I fear the finished product will be too busy if I don't. I NEVER mix several pieces of paper together.
Somehow Tara and Tiffany's pages always come together beautifully. They even used a scrap strip of paper from an old dictionary. It looks like it belongs in this layout. Now, we're challenging you to use several colorful pieces of paper in your next scrapbooking page. Get out of your comfort zone.
If you're interested in making this layout, here is the pattern that Tara and Tiffany provided to us. Have fun!!
P.S. You may have noticed a few cute flowers in the layout. We'll show you how to make those soon.
Labels:
color,
mixing,
patterns,
scrapbooking
Thursday, April 14, 2011
Treasure Box
Crafty Girl and I were inspired during a weekend scrapbooking retreat a few years ago. A group of ladies, who come back every year, have a tradition of bringing small gifts for each other. Our eyes widened as one woman showed us all of the wonderful things she was given over the years. We decided our next retreat would be the beginning of a great tradition.
Since I treasure my time scrapbooking with friends, I decided to make a treasure box, full of button, brads, and eyelets. We did set a price limit of about $10. Luckily, I already had most of the materials on hand. It was a big hit and a fair amount of work!! I found these in Michael's, but you can go to the wood section of any craft store to find ideas. The good news is that raw wood is reasonably priced. The bad news is that you have to sand it down. The edges are generally very rough. Thin sanding sheets are easy to find in nearby aisles. The difference in appearance makes it well worth the time and effort. Then, pick your stain and get the job done.
Once I was done sanding, it was time to Mod Podge. Our monthly features with Mod Podge Amy offer many great tips and she has an AMAZING website that you need to see. The basic idea is to cut the paper that you want to use into the exact shapes and sizes you'll need. I like to cut out pieces of the design for special decorations. Coat the wood with a layer of the sticky glue with a brush or sponge. Lay your paper into place, smoothing out air bubbles. Add another layer of Mod Podge to the top of the paper to seal it into place. I added letters to my drawers and some glitter glue...to give the surface some dimension. Then, I labeled each treasure chest with the name of my friends, using wooden stickers.
I meant to make four treasure boxes...one for myself. My procrastination resulted in a last-minute dash to get the boxes done. In the end, I was sacrificed. To this day, when I look at the pictures of my handmade gift, I am jealous that all of my friends have one and I don't.
Wednesday, April 13, 2011
Organize It: School Photos
Wondering what you can do with those large 8x10 photos? I've come up with a wonderful way to keep them all in one place and preserve yearly memories! 12x12 scrapbooks can be intimidating, but they don't have to be. I simply mount my photo on an 8x10 colored piece of paper (the color matches what they're wearing). Sometimes, I put cute little brads in the corners. Then, I mount that on a 12x12 sheet of black paper. The finishing touch is a big number signifying their age at the time of the photo.
The common theme is the 12x12 black paper, the simple bordering and the location of the headshot on the right side of the page. On the left side, I plan to put the class photo, mounted with the same materials.
It is such a joy to look through these albums and see the growth of my babies over the years. I've even decided to add a few shots of the kids when they were younger. 8x10 photos are so hard to store. I kept mine in frames for many years. But, once I remove them, I can't find a safe place for storage. This solution is perfect! You will have so much fun seeing how your child's features change from year to year! Within six months, my son went from having a beautiful set of teeth to plenty of holes. He was proud to show off that sweet mouth. Hope you like this organizing idea!
Labels:
organize it,
scrapbooking
Tuesday, April 12, 2011
Tasty Tuesday: Tuscan Sausage Stew
You'll Need: (Crafty Cat increases all of these amounts)
This is a recipe from McCormick that is relatively easy to make and oh so good. Crafty Cat discovered it as she was looking for quick and easy meals to make. McCormick sells small packages of pre-measured spices, with this recipe on the back. After the first bite, Crafty Cat kept the recipe and bought full servings of all of the spices:
-1/2 tsp. fennel seed
-1 tsp. basil leaves
-1 tsp. minced garlic
-1 tsp. crushed rosemary leaves
-1/2 tsp. oregano leaves
-1/2 tsp. coarse ground black pepper
-1 tsp. salt
-2 tbsp. olive oil
-1/4 cup red wine or water (I use wine)
-1 medium onion (I use 1 1/2 onions)
-1 can (15oz) cannellini beans, drained and rinsed
-1 can (14 1/2oz) diced tomatoes, undrained (I chop an extra fresh tomato)
-1 pkg (6 oz) baby spinach leaves (I load this up)
-1 1/2 pds. boneless skinless chicken breasts, cut into 1-inch cubes
(Crafty Cat prefers one package of sweet venison sausage. Try any sausage package...it offers a richer meal than chicken.)
Directions:
1-Heat your oil on medium. Add your chicken. Stir 10-minutes until brown.
2-Remove sausage (chicken) from skillet. Cook onion & fennel seed on medium heat for 5 minutes.
3-Stir in beans, tomatoes, red wine, remaining spices, and salt. Bring to a boil, stirring frequently. Reduce heat to low, cover and simmer 5 minutes. Return sausage (chicken) to skillet.
4-Stir in spinach. Cover. Cook 5 minutes until spinach is wilted.
You can serve alone or with a side.
This is a delicious McCormick recipe!! Try it.
Labels:
crafty cat,
tasty Tuesday
Monday, April 11, 2011
Peacock Shawl
When I bought a dark green peacock shawl in China a few years ago, I admired the beautiful details. In the back of my head, I knew I probably wouldn't wear it often. Actually, I knew it was possible that I'd never wear that shawl. Still, I HAD to have it. I even bought similar models for friends, in other colors. I bought a lot of "stuff" in China. Then, I came home. My lovely shawl has been crumpled up in a corner since 2008.
All of the lovely items I bought in China are back on my radar for two reasons: I want to get rid of everything I'm not using and I'm sick of seeing the same decorations each day. Sometimes, fabulous fabrics can add a touch of character to your room. Figuring out how to display fabrics is the challenge. Find a piece of silk art framed on a wall. A picture can't even compete. I decided to take advantage of the mannequin that I just happen to have in my home. Everyone has one right? I threw that shawl over "her" shoulders and styled the display with some jewelry. If I ever buy a custom frame for the peacocks, I will let you know. The rich colors and details in a long frame could transform a room. For now, I'm happy that I'm just using that shawl in some way. The same scenery has greeted me in my bedroom for more than five years. That changed this week. A little change can do you good.
Labels:
China,
fabric art,
mannequin,
peacocks,
shawl
Saturday, April 9, 2011
Homemade Headboard
I visited a friend's new home for the first time today and was thrilled to discover that a centerpiece of her bedroom is handmade...her headboard.
I love to see how other people use things they've made to decorate their space. My friend is in her early 20's and doesn't necessarily make a lot of things yet. She is still discovering her crafty side. So, attempting to make a big centerpiece, like a headboard, must have been intimidating. What I loved about this is that it wasn't really modeled after your traditional headboard. She just sat down and started creating. She picked out fabrics to match her bedspread, bought three small picture canvasses, and cut a series of rough circles. She just glued them down, not realizing the glue would bleed through. But, she ended up liking the effect.
I have to admit that I admire her carefree effort. Sometimes I over-analyze my crafts. I worry about everything being measured out. The circles would have had to be cut out perfectly...clean edges. Yet, I like her finished product better, because the edges have character. The fact that the glue bled through would have sent me into a tizzy. I would have ripped it apart because it was unintended. But, she saw it as a happy accident. Sometimes mistakes create the best crafts. I bet she had fun making the headboard too. Lately, I've forgotten to enjoy it. It made me smile to see her personal touch in the room.
Subscribe to:
Posts (Atom)