Showing posts with label jewelry. Show all posts

Wednesday, December 29, 2010

In Search of.... ORGANIZATION

My quest for world (my world, that is) organization rears its head in the weirdest way! Am I alone in this? I think that every crafter I know out there would love to have total organization of their supplies and be able to find any item, at will.

Today, surprisingly, my sights weren't set on my Scrap Shack. They were set on organizing some of my pretty things... my HUGE collection of jewelry. To the left you see how it has mainly been stored. The bags and bins (including the 2 drawer white bin) are scattered all around and filled to the brim. Why the jewelry? Why now? I have no clue. I'm on vacation from work and don't have to wear any of it for a week, but somehow I had the need to get it all organized!

I don't think there's a beautiful hanging jewelry cabinet big enough for my stash, which by the way 95% of it was gifted to me by a loving relative. I actually dream about a wonderful over sized walk-in closet complete with jewelry section.

Until then, I have to come up with a creative way to store all of my items.
My loving relative already started the mission when she gifted me the items neatly packed in snack sized Ziploc bags. I love the idea of storing the necklace, earrings, bracelets and pins all in one location. My problem is, I have a hard time putting the items back into their little bags at the end of a work day! So, today was all about re-bagging and finding partners. Once that project was done- then it was on to color coding! I told you- I was kinda off my rocker today! LOL- Soooo, I decided to put like colors together and then all items in a large rolling bin that can be neatly rolled under some furniture! I have many beautiful pins (both floral and jewelry) so I put them in one location and then there are the earrings that don't have a necklace partner. I put those all together in a bin but my next project is to design a neater storage system for those because I can see already that looking for a match can be a nightmare.

I feel so satisfied that my costume jewelry now has organization and harmony! I also look forward to creating a crafty earring solution in the near future! I make the resolution to be more organized a couple times a year and it is, once again, on my list for 2011. I'm actually kind of giddy with the thought that I took the step to be more organized before we flipped the calendar page into the new year.   


Monday, December 27, 2010

Lil' Princess Box

I know I recently shared my large over-the-door jewelry cabinet with you.  But, I wanted to share the mini-version my father made for my nieces for the holidays.
This hooks right to the wall and stores all of the cute little beads and charms a little princess accumulates.

Like my larger version...my father lined the door with hooks to hang necklaces, he connected a section of dowels with hinges that swings out to hang bracelets, he also cubed the bottom and added pink fabric as a liner.

Admittedly, I don't have a saw or powerful sander around the house.  But you might...so I'm passing along all the little homemade projects I can, just in case!!

P.S.  My father signs the back of each craft, so years from now my nieces can be reminded that their grandpa made that cute little cabinet for them.  Love those kind of gifts ;-)

Monday, December 13, 2010

Hanging Jewelry Cabinet

Each day, just before I leave for work, I open the door to my homemade jewelry heaven.

Apartment living requires the creative use of space.  My over-the-top love of jewelry takes up a lot of space.  Using my towel rack in the bathroom saved room for awhile.

Now, I have this handy jewelry cabinet, made by my father, to either mount to a wall or hang over a door.

I fell in love the first time I saw it because it fulfills my need to organize...and it is made by someone I love.  I know this isn't something that just anyone can make.  But, if you have a woodworker in your family...here are some ideas.

There are hooks EVERYWHERE to hang bracelets, necklaces, and earrings.  My father placed cubes in the bottom for pins and bracelets that I can't hang.

He lined the door with racks of slitted wood to push my earrings into.  Also, I have four dowels connected to the base with hinges so I can pull them out to look through the necklaces and then push them in flat to close up the cabinet.


I started out with lots of room.  Then, with all of that extra space taunting me, I slowly filled up my over the door jewelry cabinet.  I've already put in an order for another one.  There's a door to every room.  No need to limit myself.

Monday, November 8, 2010

Monday Smiles

Today I wore to work a little necklace and bracelet I whipped up yesterday while enjoying conversation with my aunt. It felt good to look at them all day and reminded me of her!

Thursday, November 4, 2010

Artist Spotlight: Loretta Fontaine Jewelry


Combine two of my greatest loves...photography and jewelry...and you get the crafty work of Loretta Fontaine.  The best part is, she uses her skills to raise money for charity.  She has also managed to get her work displayed in several publications.  Find out how she's getting all that great attention as we meet this week's Artist in the Spotlight:  Loretta Fontaine.

1. How did your adventure in jewelry-making begin?

When I was a graduate student in architecture, there was an advertisement in the student paper stating that you could have a free parking lot space at Springfest, the University at Buffalo's beer and music festival, if you wanted to sell stuff you made yourself. My parents had just been to Trinidad and brought me a copper necklace. Inspired, I drove to a bad industrial section of Buffalo and bought some scrap copper from a roofer. I started to make some jewelry from the copper with a propane torch and plumber's solder. I made eighty-eight dollars at the Festival and was hooked. The next two years I made jewelry and travelled all over New York state to craft shows while I finished my Masters in Architecture. I worked three years after graduation in an architecture office and then left to pursue jewelry full time.

2. How would you define your style?

Because the jewelry is handmade, I'd say it has an original and artisinal style to it. I design in sterling silver and many of the pieces have my own miniature original photographs in the jewelry. I'm influenced by nature, and patterns.

3. Pictures of your jewelry have appeared in several books. What are you doing to successfully get the word out about your jewelry?

I've had my work published in several magazines, InStyle.com, and seven books on jewelry. The latest just came out - 500 Gemstone Jewels, A Sparkling Collection of Dazzling Designs, edited by Cindy Edelstein. I don't think there is any secret to getting published. Just make the best work you can and be sure to submit it!

4. Tell us how to find and buy your pieces.

My blog is http://www.applesandrubies.blogspot.com/ My studio is just south of Albany in Delmar, New York, and my website is http://www.lorettafontaine.com/, you can contact me directly or see a list of galleries across the country that carry my work.  I have an open studio in Delmar with potter Liz Vigoda on the weekend of Saturday November 20 & Sunday 21, 2010. Here's the link: http://www.delmaropenstudios.blogspot.com/

If you happen to be in upstate this weekend, you can find Loretta at the 5th Annual Albany Holiday Crafts on Madison: http://www.holidaycraftsonmadison.blogspot.com/

Did I mention that Loretta is GIVING AWAY one of her beautiful creations?  Just in case you missed yesterday's tease, these reversible earrings are FREE to the winner.  You know the rules:  Comment here to become eligible.  A second comment identifying yourself as a registered follower of this blog will double your chances.  The deadline is Noon EST next Wednesday, November 10th.  We'll announce the winner on Thursday, November 11th.  Why not?  Start typing....after you browse through some more examples of Loretta's lovely work.  Good luck.

Wednesday, November 3, 2010

Jewelry GIVEAWAY!!

Leading up to the holidays, you will enjoy a storm of giveaways on this blog as we introduce you to talented people, their crafts, and our own little creations.  Today, I'm ecstatic to show you the next prize up for grabs.  These gorgeous sterling silver reversible Amy earrings (the picture shows both sides), with a Stuyvesant Fern miniature original photograph and grey freshwater pearls were made by our upcoming Artist in the Spotlight.  You'll meet her tomorrow...and that's when you can enter to win.  Don't forget...there is a deadline.  Then, keep checking back for more and more and more GIVEAWAYS.  See you soon!!

Friday, September 24, 2010

Decorating with Jewelry

I always want to have my jewelry laid out in front of me as I accessorize.  I want to see every necklace I own so I can make the perfect match.

There's nothing worse than trying to untangle the ONE necklace you want to wear from a ball of twisted metal and beads.  The problem is...chunky jewelry is in style right now and jewelry cases just don't offer much space.  So, you're forced to layer your necklaces and dig through them each day while they wrap around each other, forming tight knots.  Let's face it...do you even know how much jewelry you own or do you pick whatever chain you can get to?  After years of apartment living and serious accessorizing, I've discovered a fun way to display all of my jewelry, save space, and give my bathroom a funky style....and it's FREE!!!!

The towel rack in my apartment is right next to my mirror.  I thought it was the perfect spot for my pearls.  I had stacks of necklaces around my bathroom...and quite frankly I didn't even realize what was in all of those piles.  I hung all of the necklaces up on the towel rack in no particular order and loved the look.  My counter was suddenly clear, my necklaces were all visible and accessible, and my towel rack actually became a pretty decoration in my bathroom.  My jewelry now has a dual purpose.  I dress up my neck AND my bathroom with pearls.  I've gotten compliments from many people over the years who have adopted the idea.  In fact, if there isn't a towel rack near the bathroom mirror next time I move...I'll put one there.

Thursday, September 23, 2010

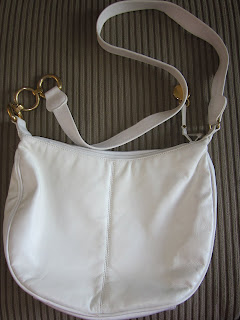
Purse Makeover

I know it's officially fall and time to put away our white for a few months, but I couldn't pass up the opportunity to show you a cute little project I made for myself when the weather was still warm and I wanted to cheer myself up!
Want to give your purse a fresh new look without spending a penny? Check out this D.I.Y. It will take you 10 minutes!


Take your plain purse and go shopping with it in your jewelry stash! I know all you ladies have big ones- so this shouldn’t be too hard.

I found this cute beaded yellow necklace and a gold chain. I also found a beautiful Yellow flower pin that I knew would make the purse look perfect.

Then I went to my ribbon stash and picked out a matching piece of ribbon. Tie the ribbon on to the end, then every few inches tie the ribbon to the necklace. At the end of the necklace tie a pretty bow.

Then, open the necklaces and loop them on to each end of the purse strap and refasten them.

Add your pretty flower and you’re on the go! Isn’t it cute?