

Showing posts with label guest blog. Show all posts
Showing posts with label guest blog. Show all posts
Thursday, March 31, 2011
Dimensional Magic Collage Art
Thursday, March 10, 2011
Guest Blog: Looking at everyday objects through "papercraft glasses"

and I love everything papercrafts! We are always challenging each other with new
ideas and projects and have been scrapbooking and stamping for years.
Since we live far away from each other, we often decide on a long distance project
to work on and then mail them to each other-it brings a whole new meaning
to "you've got mail". In July of 2009, we decided to start a blog - TwoCraftingSisters, so we could continue
to share our ideas with each other and also with anyone else who is interested in
crafts. It has opened up a whole new world for us!
We are very excited to be invited as guest bloggers on this site! It's a first for us!
Now the challenge was on - design a project that could be done in a relatively
short time to meet our "deadline". I love mini albums and have been inspired
by Sheila's re-purposing of Starbucks items in her Etsy shop. So, with the idea of making an album, going through
my stash, my husband's birthday coming up soon, and a little inspiration, I got to work.

Found some great papers and stickers in my stash to put to good use!

I have been trying the new Via from Starbucks and on a recent trip to BJ's bought
a bulk pack. Over the last few years, I find my mind works in a new and
different way. I see objects differently now -such as how they could be used in a
project. So, when I looked at my empty pack, I thought, this would be great as the
base for a mini album. Always better to re-use than throw away! I took the coffee
out of several more packs, and set to work.

It really was simple. All I had to do was open up the pack, lay it flat on the
patterned paper, and trace the shape and adhere it to the Via pack. I always like to
ink the edges of my papers for that distressed look, and this project was no different. For
the top section, I just measured the width and wrapped the patterned paper around it.


see, it does a beautiful job of punching the holes for binding. I decided to make
my book so the pages lifted up, so punched the holes at the base.


easy to take out.

Final step - add some cute stickers to the photos. When the mini book is about
your dog, how can you go wrong? Shhh...don't spoil my husband's birthdaysurprise!

Thanks for giving us the opportunity for a new adventure!
Check our blog for more great ideas! TwoCraftingSisters.
Thursday, March 3, 2011
Guest Blog: Mini Book Made From Scratch

started I'd just like to say thank you for asking Maura and I to do a guest post. We are
both honored.
I like to do two things when crafting---1. Make mini books and 2. Use items already in
my stash. This little expanding folder mini book does just that. It is easy to make from
scratch and you most likely already have everything that you need. I started with little #1
coin envelopes that measure 3 1/2" x 2 1/4". A simple search on Google or Amazon will
give you lots of choices-you can also find these at your local office supply type store or
in a pinch, simply cut down an envelope to size and seal the cut side to form the pocket.

pieces that measure 3 3/4" x 2 1/2", two pieces that measure 3/4" x 2 1/2" and one piece
that measures 1 3/4" x 2 1/2". Also cut your pieces of patterned papers in these
same sizes as well as one long piece that measures 2 1/2" x 12" (you will trim off the
excess once your pieces are adhered down.)

ink them, now is the time to do that. Then adhere these pieces to the long patterned piece
as shown in the photo leaving about a 1/16" gap between pieces. You'll see why next.


to cover the chipboard sides and also used a bit of sandpaper around the box edges.
Gather your coin envelopes. Cut inserts out of cardstock that measure 3 5/8" x 2".

another to form a stack.


envelope, apply adhesive on the entire back of the envelope and adhere the stack to the
back panel of the book (and in this photo you can also see the magnets I used to close my
book. Now is the time to add those if you so choose so that the one will be hidden from
view. However, you could also close these with Velcro dots or a ribbon. Your choice.)

the cover, run your finger along the envelope edges to make sure it is adhered.

them on the inserts for pull tabs.

even smaller at 2 3/4" x 1 3/4". I covered them with dictionary papers before adhering
them together and I made tiny little library cards for the insides.


Patterned papers-Tim Holtz and Cosmo
Cricket
Cricket
Wednesday, March 2, 2011
Guest Bloggers: Two Crafting Sisters!

I'm excited to introduce you to two amazing women who will be offering some beautiful craft D.I.Y.'s for the next two Thursdays!!!
Maura and Sheila started off a number of years ago stamping, and both of them loved
to make cards. It always feels good to send a handmade card to friends and family to
celebrate a special occasion, or to get some real mail in your own mailbox. It feels like
sharing a bit of sunshine and they still like to do that, but then Sheila started
scrapbooking too. Maura wanted nothing to do with that for a number of years - she
liked stamping. Well, Sheila finally talked Maura into it, and they haven't stopped
liked stamping. Well, Sheila finally talked Maura into it, and they haven't stopped
since!
They've always shared ideas with each other even though they live in Ohio and New
York. The sisters find ways to do projects long distance and share them. Usually by
setting a due date for the project, then ship it off, and set a date for opening the boxes at
the same time to see what the other has created. Once a year, they try to meet and get
some "in person" time together- at a crop or even camping.
These sisters can start with the same materials and end up with two very different
projects. Sheila has a nice clean, graphic style, while Maura likes to play with
patterns and colors. Sheila has been published in Paper Crafts magazine, while Maura
likes teaching classes at her local scrapbook store. They've discovered that crafting
becomes therapy in times of stress, it's a great social outlet, and keeps both sides of
the brain connected. Sheila and Maura have also discovered through their shared
passion for crafting, a great way to keep connected since they live hundreds of miles
apart - through long-distance projects, and on their blog, TwoCraftingSisters.
Thursday, February 24, 2011
DIY Bangles Made with Mod Podge

Wednesday, February 23, 2011
Meet Mod Podge Amy!

Marketing by day, Mod Podge Mistress by night! I can't tell you how over the moon I am to introduce you to our new monthly guest blogger! Mod Podge Amy is the creative mind behind Mod Podge Rocks! She likes to wear stripes and/or bright colors every day because it makes her happy! When I went to her blog I was immediately happy. She exudes excitement and energy!
She says "I love the color blue, dogs, reading, cold weather, funny movies, road rallies, yogurt, garden gnomes, sock monkeys, running, tattoos, being outdoors, buttons, snuggling and apparently blogging." You have to check out her blog- her Mod Podge projects are second to none- and if you have a project she accepts submissions to be featured!
Amy moved from rain loving Seattle to Hot-lanta! That's Atlanta Georgia if I got to cheeky for you!hehe. She's been knitting for 18 years, sewing for longer and decoupaging for just a few- but I guarantee you she is THE expert in the world of Mod Podge.
Amy is joining our little Crafty Life and Style family as a monthly guest blogger for a YEAR!!!!! She will be offering some amazing crafts AND giveaways. I'm so excited!! This is really a dream come true for me! Can you tell? Please give a warm welcome to Mod Podge Amy!! She has an awesome D.I.Y. coming TOMORROW!
Sunday, January 23, 2011
Shutterbug Sunday: Photo Editing
We are so happy to have Photographer Ashley Sisk provide us with an amazing guest blog about photo editing today. She's a master at it. Please visit her website- and don't forget to leave her a sweet comment!
A couple of weeks ago, I was asked to share some simple editing tricks. I love to edit (in fact, I may love editing more than photography itself), so I was happy to accept. Although I operate primarily out of Adobe Camera Raw and Photoshop (as well as Photoshop Elements), I wanted to offer some tips that could be applied in any program.
A couple of weeks ago, I was asked to share some simple editing tricks. I love to edit (in fact, I may love editing more than photography itself), so I was happy to accept. Although I operate primarily out of Adobe Camera Raw and Photoshop (as well as Photoshop Elements), I wanted to offer some tips that could be applied in any program.
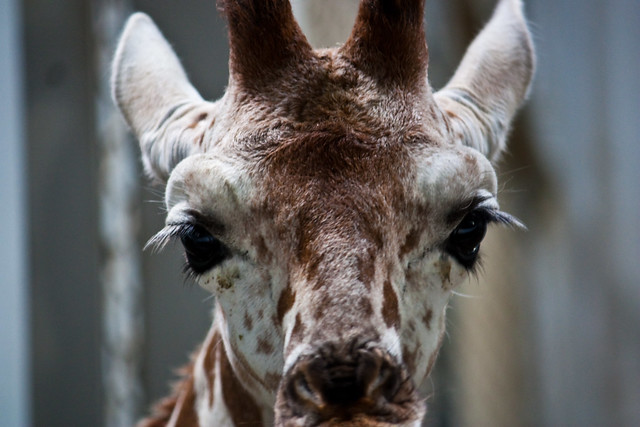
First, let's start with a SOOC shot (straight out of the camera). If you follow my blog, I mentioned that I've been having an ongoing battle with the lighting in my inlaws' home. You might never know it if you only looked at my edited shots, but here is one of the originals:

How ya like that white balance? Or lack there of.
Anyways...as I mentioned before, I wanted to start simple....so, I started this edit in Adobe Camera Raw. Regardless of what editing program you're working in, you should have some of the basic functionality that Adobe Camera Raw offers. If you are using Photoshop or Photoshop Elements, you already have ACR (and although I shoot in RAW, you can open JPG files in ACR by opening PS or PSE - go to File > Open As> Select open as Camera Raw file and select your image). Below, I've copied my SOOC data and the revisions I made in Adobe Camera Raw. Here's what I did:
Anyways...as I mentioned before, I wanted to start simple....so, I started this edit in Adobe Camera Raw. Regardless of what editing program you're working in, you should have some of the basic functionality that Adobe Camera Raw offers. If you are using Photoshop or Photoshop Elements, you already have ACR (and although I shoot in RAW, you can open JPG files in ACR by opening PS or PSE - go to File > Open As> Select open as Camera Raw file and select your image). Below, I've copied my SOOC data and the revisions I made in Adobe Camera Raw. Here's what I did:
- Used AUTO to correct my white balance.
- Pulled the recovery slider up.
- Dropped my blacks a bit.
- Decreased my brightness.
- Increased my contrast.
- Decreased my clarity.
- Decreased my saturation.
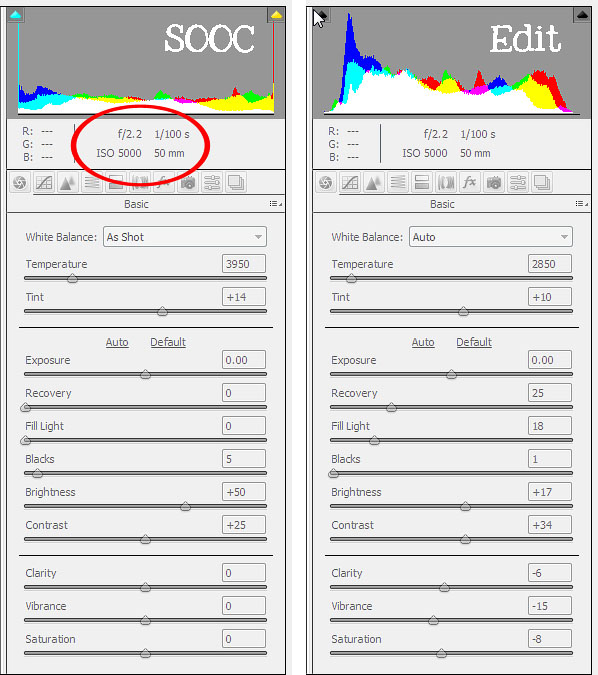
Just making those few adjustments creates a nice clean edit. I've included my edit below. If you're new to editing, I encourage you to try adjusting the exposure, brightness and contrast within your editing program.

I should warn you that most editing programs offer an "Auto" option. Sometimes selecting auto works perfectly but more often than not, you'll need to make some manual adjustments.
So that was my very basic edit only using Adobe Camera Raw. If you're interested in an advanced edit...keep reading.
Beyond my edit in Adobe Camera Raw, I brought my photo over to Adobe CS5 (also known as Photoshop). Most of my steps can also be performed in Photoshop Elements. Here are my steps:

- Created a duplicate of my background. I applied a high pass filter (found under FILTER at the top of the screen). I then applied a soft light blending mode to the layer. This is my #1 favorite trick to make the details of your image pop. You can lower the opacity if needed and/or use a layer mask to erase part of the effect.
- Created an adjustment layer - CURVES. In PSE, if you don't have an action curves adjustment, you can download one here (it also includes a mask layer that I use often).
- Created a new adjustment layer - LEVELS. I pulled the left side (shadows) of the graph to a 11 - this makes my blacks just a tad bit darker. I pulled the middle bar (mid-tones) up to a 1.11 I often pull the midtones up to a 1.38 to brighten up an image, but that was not necessary here.
- Created a new adjustment layer - BRIGHTNESS/CONTRAST. I decreased brightness to -10 and added a contrast of 8.
- Created a new adjustment layer - HUE/SATURATION. I find with my computer that I always have to pull back on my yellows and reds (if I want to avoid creating oompa loopmas).
Beyond this point, I felt like my shot looked a little too much like a snapshot (nothing wrong with that, I mean, it is a snapshot), so I decided it needed to be cropped. I used the same photo ratio to crop the photo. I then made a few more adjustments and created two photo options (I wanted to share both a color and black/white). With my color shot:
- Created an adjustment layer: BLACK AND WHITE (in Photoshop Elements, you'll want to use a background copy then go to Enhance>Convert to Black and White). I created a custom black and white by playing with the sliders and adding a tint. I also lowered the opacity to 15%.
- Adjusted my brightness/contrast and levels adjustment layers for a little more drama.
- Finally, I applied Totally Rad's Lux action at 50%. For a similar effect...you can create a new fill layer - fill it with a shade of cream or light pink, set the blending mode to screen and lower the opacity.


So, hopefully that all made sense and you've learned a trick or two.
If you want to see more editing techniques, I have recently started a new photo challenge called Shoot and Edit with Jill at Forever'n Ever'n Always Photography. Every Monday morning Jill will post a SOOC (straight out of the camera) shot and then have a link up for all of you to share your SOOC too. You will have until Wednesday to link up.
Then, on Thursday morning I will have my SOOC shot fully edited with a tutorial for everyone to follow to enhance their photos as well.
Well I gotta run back over to Scavenger Hunt Sunday! If you have a chance, come see me and have an awesome day!

Saturday, January 22, 2011
Meet Ashley Sisk

I'm a big fan of hers and I just love the creative pictures she takes. They POP off the page! Ashley is going to be our guest blogger for tomorrow's Shutterbug Sunday! Please come back tomorrow and show her some love!!!
Sunday, January 2, 2011
Shutterbug Sunday: Display Your Pictures

First off, I have to say thank you, thank you, thank you to everyone here at Crafty Life and Style for asking me to write this post. I fancy myself some great photographer, but really I'm just like the rest of you. The tip I want to share today is what to do after we push that button. We've captured that moment in time and now what?
The first thing to do is get it off that card. Cards fail and if your card fails then you've lost all those pictures. I double store my photos. I have two external hard drives. There are two copies of each photo on each one of my hard drives. I also have a pro flickr.com that I am trying to upload all of my photos to just in case something happens to the hard drives. (You can check them out here.) I've heard of people who use jump drives. Each time they clear their card, they put it on a jump drive and file the drive away. You can put them on CD. The main thing is to have them somewhere else just in case your card fails.
Now you have to share them. What fun is it to take a great picture and then not show it to anyone? I was sharing a lot on Facebook but it took so much time to downsize them and that's one of the reasons I started the flickr account. But that doesn't spruce up my home any. I'm going to share a little secret just between us OK? I have picture frames in my house still with the fake family pictures in them. How lame is that? I know it's really bad especially since I take photographs as a second job. But I'll share what's on my wall, what's ready to be hung and what's going to the printers to get hung.

This one hangs above my husband's computer area. It's his best buddy Gabe. It was a Christmas present a few years ago.

This one is going in my craft/office room when it's done being remodeled. It's currently in a closest. This one is special because it's the first photograph that hung in an art gallery.

This one just got back from the printer. Not sure where or what is going to happen with it but at least it is printed.
I donated this one to the zoo for a fundraiser and it's getting reprinted for my office. I want to line those walls with special photographs.
Now get out there and take some great shots and share them. Decorate your home with them. It's a cheap way to bring some color into a room.
About Melissa-
 Melissa loves her camera and her friends have joked that the camera is just part of her body. She started her passion for photography as a child in 4-H. She blogs about her pictures and her husband's photography, photography in general, and photography tools at Shields Photography.
Subscribe to:
Posts (Atom)